
WordPress/WooCommerce is an ecommerce platform that enables you to build a successful online business & website. The Wodely integration with WordPress (through WooCommerce) now helps you not only process orders for delivery on your WordPress account but now allows those orders to be sent instantly to your Wodely account so you can start dispatching, tracking and managing the deliveries to be fulfilled out in the field!
To get started with your WordPress/WooCommerce integration, follow our simple 5 minutes WooCommerce Quick Start Guide below, and download the attached WooCommerce Plugin below
1. Generate your Wodely API Key
- Navigate to the Settings/Integrations page within Wodely Admin Dashboard
- Create an API key and copy it for use later
- Note: If you work with multiple merchants/restaurants under the same Wodely account, you can attach the API key to a merchant. All orders created from this API key will be assigned to the attached merchant automatically

2. Upload the Wodely Plugin to your WooCommerce site
- Navigate to the Settings/Integrations/ WooCommerce page and download the Wodely WooCommerce Plugin to your computer.
- Login to your WordPress account and navigate to Tools/Plugins

- Upload the Wodely Plugin: click “Add New” / “Upload Plugin” /”Choose File”/ “Select File”/ “Install Now”

3. Activate the Wodely Plugin
- Activate the Wodely Plugin by pushing “Activate Plugin”

4. Configure WooCommerce Shipping Settings
- Click on “WooCommerce” / “Settings”/ “Shipping”/ “Wodely”
- Add your API Key (from Wodely)
- Add your Merchant ID if you want to link this store to a merchant account

- Dispatch Location Settings: this is used if your dispatch location is permanent (orders originate from the same location). This dispatch information will be populated on your Wodely task.
- Pickup Address in Checkout: this is used if you allow your customers to create the pickup and drop off addresses
5. Auto‑Mark WooCommerce Orders as Completed (Optional)
This step is optional. Please proceed only if you want WooCommerce orders to be automatically marked as Completed status when the corresponding Wodely tasks are successfully completed by drivers. To set this up, you’ll first need to enable the REST API on your WooCommerce store:
5.1 Enable WooCommerce REST API
- Review the guidelines for generating WooCommerce REST API keys:
https://docs.woocommerce.com/document/woocommerce-rest-api/ - Ensure your API keys have both read and write permissions.
- Copy the Consumer Key and Consumer Secret.
5.2 Set Up Webhook on Wodely
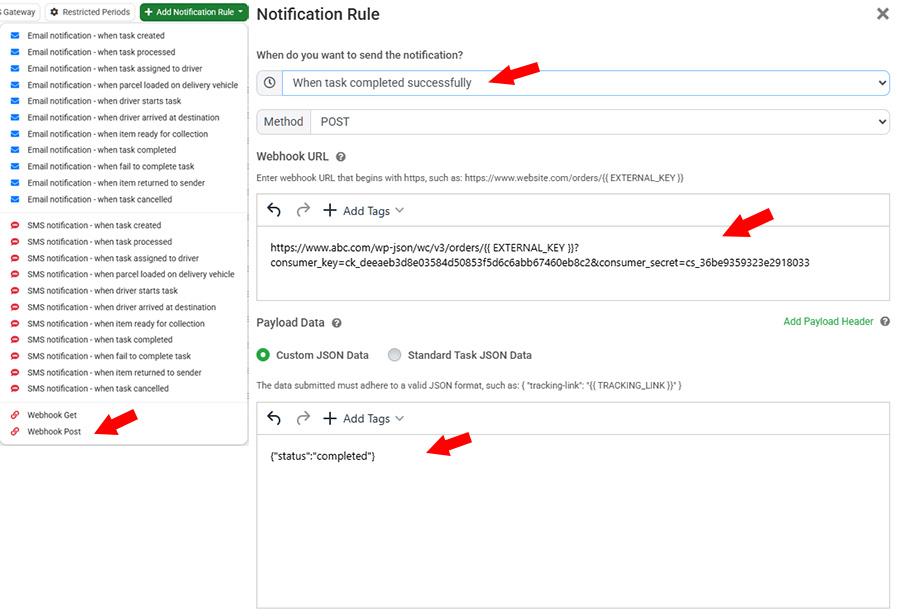
- Go to Settings → Notifications page on your Wodely admin portal.
- Click Add Notification Rule and select Webhook POST.
- Choose When task completed successfully.
- Set the HTTP method to POST.
- Generate your webhook URL
For example:

your website domain is https://www.abc.com
your consumer_key is ck_deeaeb3d8e03584d50853f5d6c6abb67460eb8c2
your consumer_secret is cs_36be9359323e2918033

Then you can link them in the following format:
https://www.abc.com/wp-json/wc/v3/orders/{{ EXTERNAL_KEY }}?consumer_key=ck_deeaeb3d8e03584d50853f5d6c6abb67460eb8c2&consumer_secret=cs_36be9359323e2918033
- Copy and paste your URL into your Webhook URL.
- Set the payload JSON data to {“status”:”completed”}
- Click on Save button to create webhook
All Done!
Note: Kindly be aware that our plugin integration is specifically configured to synchronize orders that originate from the checkout page of your website with Wodely. Orders generated through the WooCommerce admin backend will not be automatically transmitted to Wodely using this method.
Alternatively, we provide an alternative integration solution through WooCommerce webhook, which operates seamlessly within the WooCommerce backend. This integration ensures that all orders, regardless of their origin on the checkout page or admin portal, are efficiently forwarded to Wodely.